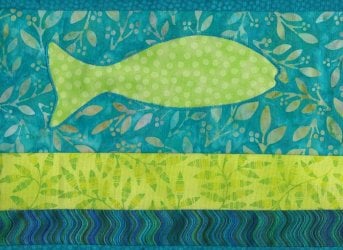
Artful Homemade Quilts Have A Way

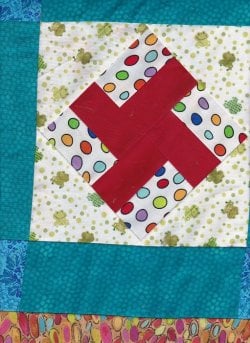
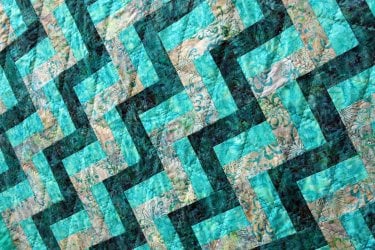
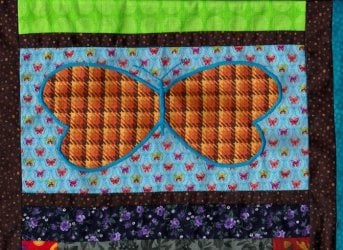
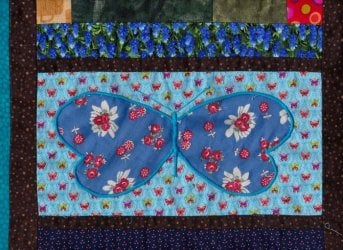
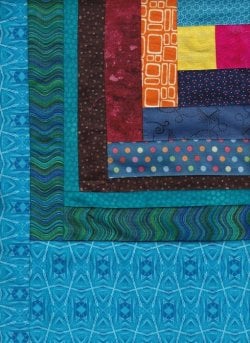
This one was hard to finish. I haven't designed and completed an applique quilt in a long time...maybe a year?

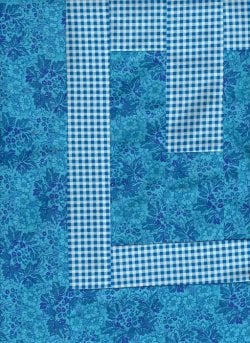
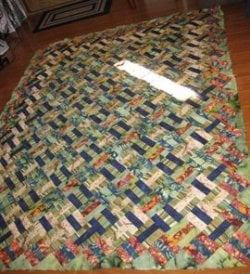
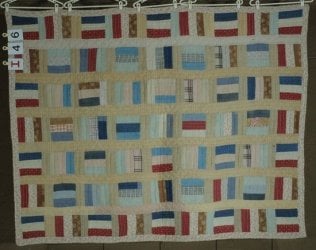
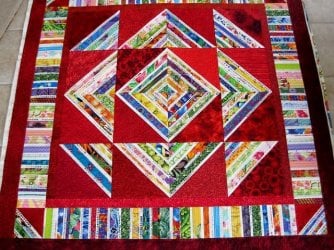
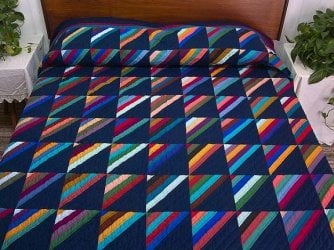
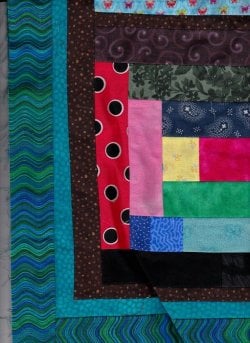
So, it's a nice-sized little quilt for a child at the shelter. It's a lot wider than anticipated, although it really hasn't been measured. I may add two 6" strips at top and bottom to give the kid who gets this quilt another couple of years use. All that would have to be done is cut it horizontally instead of vertically, and it would look right, imho. :eusa_shifty:

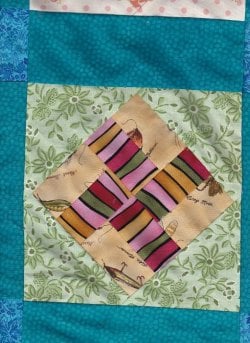
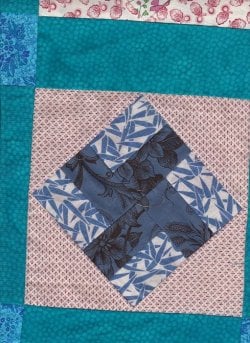
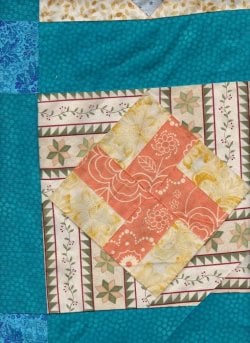
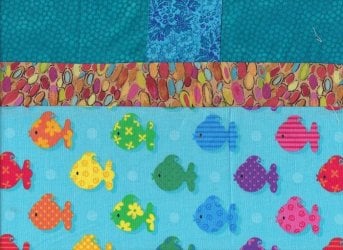
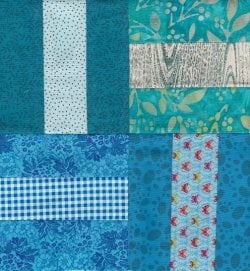
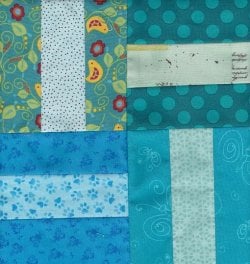
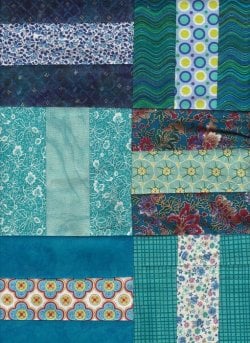
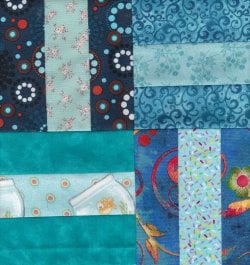
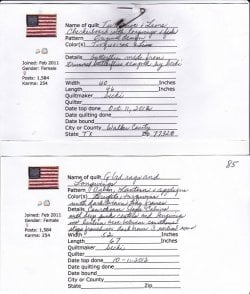
This and the next posts will be the final 6 scans. The 9th square is the very old fabric, embroidered with details like the others, for Patriots, to whom this quilt is in honor of. :)
 

Attachments

  • $Glad Rags and Longwings Quilt, Outer border.jpg
    $Glad Rags and Longwings Quilt, Outer border.jpg
    87.2 KB · Views: 38
  • $Glad Rags and Longwings Quilt, Satin stitches5.jpg
    $Glad Rags and Longwings Quilt, Satin stitches5.jpg
    101.6 KB · Views: 27
  • $Glad Rags and Longwings Quilt, Satin stitches6.jpg
    $Glad Rags and Longwings Quilt, Satin stitches6.jpg
    110.9 KB · Views: 34
I like to save warm colors on the colorwheel for last. They're just more fun, as was the fabric that was printed before anyone here was born. :)
 

Attachments

  • $Glad Rags and Longwings Quilt, Satin stitches7.jpg
    $Glad Rags and Longwings Quilt, Satin stitches7.jpg
    100.8 KB · Views: 31
  • $Glad Rags and Longwings Quilt, Satin stitches8.jpg
    $Glad Rags and Longwings Quilt, Satin stitches8.jpg
    82.8 KB · Views: 30
  • $Glad Rags and Longwings Quilt, Satin stitches9.jpg
    $Glad Rags and Longwings Quilt, Satin stitches9.jpg
    112.8 KB · Views: 29
After figuring a panacea for completion of the gladrags longwings quilt, dutifulness to preparing a quilt for the quilting phase facilitates a far more desirable outcome than neglecting this duty. That means getting the surface to a consistency when layering techniques are being effected. IOW, it helps if to have but 1 layer of quilt top, even when one fabric is appliqued over the top of another when you can. Skillful quilters know this and remove the layer underneath large appliqued areas by using stitches that will keep things tucked nicely away or under thread where it will not be poking through after a dozen washes. If one is using a stick-on product behind the applique, believe it or not, a 2 millimeter blanket stitch in width and length on the sewing machine accomplishes just that. Also, a 2 or 3mm by 1 mm zig-zag stitch will do almost as nicely as the machine blanket stitch. A hand buttonhole stitch was used by our mothers when appliqueing raw edges before stick-on products were made nationally available to quilt specialty stores by the late 1980s.

Sheeze. This was just gonna be about a quickie little quilt that was finished last night after the other one got finished. Well, almost finished except for adding additional length to top and bottom rows of Glad Rags/Longwing quilt using the usual feminine devices for lengthening a child's quilt. :eusa_whistle:

Here's the turquoise and lime checkerboard quilt parts (it may have been shown the checkerboard squares a couple of weeks back) All said, careful cutting behind the longwing butterflies on the last quilt resulted in having several butterfly backgrounds left over, and the two butterflies in the sky area on top of the quilt were such cutaway leftovers. It would have saved a double sewing over if the edges had been secured better with a 1-thread whip stitch over the outer edges, then zigzagged them. Hindsight has 20-20 vision, doesn't it. Well, too late! It's done. :)

The fish was designed last night to counter-balance the top row of butterflies with a bottom row of fishes. Overall measurement of quilt is 40x46".

Below there are 6 scans to show for this quilt:
 

Attachments

  • $Turquoise, lime checkerboard 4, side borders .jpg
    $Turquoise, lime checkerboard 4, side borders .jpg
    81.4 KB · Views: 26
  • $Turquoise, lime checkerboard 2 lower border.jpg
    $Turquoise, lime checkerboard 2 lower border.jpg
    90.4 KB · Views: 25
  • $Turquoise, lime checkerboard 1.jpg
    $Turquoise, lime checkerboard 1.jpg
    100.7 KB · Views: 30
Last edited:
The Gladrags and Longwings quilt DID get a final border this morning. Quilts that are too wide and not long enough just look frumpy. The fabric that was picked was less than half a yard. It took some creative cutting to go all the way around the 52x67" quilt. It's still wide, but its overall appearance was made better by adding the 8" top and bottom.

The good thing about passage of days after making the ultimate quilt information document is thinking up about what was left out. Below have all the details one really needs to know except one: certification that the quilt's designation is charity by the disbursement organization so the quilt you made for a child with no quilt does not go to the organization's secretary's new grand-baby, a wealthy donor who supported the organization, for sale at the local log cabin for batting in which less was collected for the quilt than went into materials.

At $11 a yard if good quilt shop fabrics are used, the investment in a quilt with a surface area of 3000" takes 5 yards or $55, another 2/3 yard for binding; batting costs for a small quilt are now up to around $25, and thread is now $7 a spool. A small quilt can take 2 spools average, unless the quilter goes all out and uses a lot of thread to strengthen the quilt for its intended recipient. All that adds up. Enough said on subject.
 

Attachments

  • $Glad Rags and Longwings Quilt Outer border.jpg
    $Glad Rags and Longwings Quilt Outer border.jpg
    108.3 KB · Views: 30
  • $Quilt Detail attachments.jpg
    $Quilt Detail attachments.jpg
    58.4 KB · Views: 37
Very nice Becki....I really like the butterfly ones.
I think butterflies are such pretty creatures......I like to think they can fly up to the Heavens....they are so delicate, so wonderful to watch :)
 
Dabs, I've probably designed half a dozen butterfly, but as I was sketching out the longwings butterfly, I had forgotten their name, forgotten they were the Florida state butterfly, etc. I just remembered how beautiful they were, and simplifying God's magnificent perfection is not an easy task. Without looking at a model, though, it helped me not to think about all those details on the real mcCoy and come up with a shape a small child might perceive before he is out of the cradle. If parents have enough models around the house for children to learn the names of from nursery days until the first words are uttered, it so greatly helps them when they start their school years. Early learning what simple shapes represent is the best gift a parent can give her child. That's why I wrote a book 20-something years ago "Aesthetics ABC Animals" in which use of them for crafters is available in my album by clicking on my profile. It's here for anyone who'd like to use the designs and would like to save themselves the 6 months it took me to make them for a child's quilt I wanted to make for nieces and nephews. Since selling the book in my quilt shop for years always drizzled in a little more stay-in-business money, now that I've retired, I'd like friends that USMB members are to have access to them with any credit going to USMB.

freedombecki-albums-aesthetics-of-abc-animals-designs-by-becki-picture4807-aesthetics-of-abc-animals-album-quilt.jpg


To use the designs at the link, USMB members may click on one of the black-and-white designs and send the result to the copier, "fit the page." If you have paint in your Windows or other program, you can resize these little critters from jewelry size for enameling all the way up to any size you can make your printer work for you. Enjoy!

If you don't know the name of the creature, go to the album, and click on the X creature to find out its name. If you don't believe it, scoop it up and put it into your Bing! or other search engine, and you will know right away on which continent it resides, hopefully, that is.

Yes, the stripes on the zebra are cotton fabric appliqued to a cotton base and machine blanket-stitched onto whatever background fabric you use. A savannah grass print would be nice, if you can find a quilt store with a specialty in landscaping prints. If not, go to Ebay or etsy, search for "grass, cotton quilt fabric." If you don't find any, try again a few days later. You will eventually find the right fabric if you play your cards right.
 
Last edited:
Here are images of a make-it-today quilt designed over lunch at Daisy's Diner yesterday, came home and got busy with cutting. Didn't sleep a wink last night, so it was up and at 'em when it was too tiresome to be annoyed about not sleeping. :D

This is the third in a sequence of turquoise quilts planned for the charity bees to add to the patriot butterfly and the lime-and-turquoise butterfly and pondscum work, simplified into naive style for a child and both finished earlier this week.

The quilt will be before adding border about 30" x 57"

This took 1 1/8 yards of light shade of turquoise cut into
4 strips, 7 1/2" by the width of the light cotton check material (aka weft)
6 strips 2" light for first border
This took 1 1/2 yards of the dark cotton calico floral print cut as follows:
4 strips, 7 1/2" by the width of the dark cotton calico floral print (on the weft also)
6 strips 3 1/2" by the width of the dark cotton calico floral print (on the weft also)
1 strip 4" by the width of the dark Cotton Calico floral print (weft or stretch width of cotton calico)
Sew and press open all seams as follows: 4" dark strip, 4(7 1/2" light strip, 7 1/2" dark strip) Beginning with the 4" dark strip and ending with the 7.5" dark strip, you should sew until you have a dark4", light7.5", dark7.5", light7.5", dark7.5", light7.5", dark7.5", light7.5", dark7.5", ( 9 rows beginning and ending with darks, and seams pressed down center or all the same way if you prefer. I figured 15 strips, but when I actually cut, I got 17 strips, which will add 5 inches to the width schema using 1/4" seam allowance. Cut all the rows 2.5" (2 1/2") or two and one half inches all the way down the line on the warp (same as the selvage) or length, that starts and ends with a 4" dark and a 7.5" dark, made a little shorter by virtue of the seam allowance of .25" (1/4") or one quarter of an inch.

Sew your 15 rows with the 7" dark strip top piece with a second strip turned opposite, with the 4" dark strip on top. That causes the basic bonehead bargello appearance as your quilt goes together.

Pin only if your machine does not have a built in walking foot such as upper end Pfaffs and the #8 super duper Bernina. :badgrin: Treat yourself to swiss pins--glasshead tops with fine shafts. Using humongous pins results in small tear holes. Sorry, I didn't write the rule book, I just know what the rules are, and the right equipment helps you wind up with a product that will outlast the holey ones by decades of use and neutral-Ph soap care. I didn't write that rule either, but I have a couple of detergent-faded quilts that I let the male of the house throw into the laundry without telling him to set the machine at gentle motion wash and use neutral-Ph quilt soap. If you don't have a quilt store, go to a feed store in a farm community and ask for udder soap. Yes, cow udder soap. It's neutral-Ph, probably reasonably priced too, if you don't mind buying a gallon of the stuff. You only use 2 tablespoons with enough water to fill the gentle cycle wash that will clean your quilt top nicely.

If you are using such a sewing machine, be certainly sure you are using the upper dual feed or walking foot by raising the presser foot lifter, and pulling the built-in walker out-down-forward to engage it or whatever your machine instruction manual says. Otherwise, pin opposite ends face together and sew all the same way. If you do not sew all the same way you will be most sorry to be spending the time you saved doing a quickie quilt ripping and redoing, but not to worry.

Ripping out a seam you just sewed improperly is an exercise in developing a sense of humor quilters need and acquire as error appears. And if you sew it wrong the second or even third time wrong, welcome to the club. This stuff goes away after about your 600th quilt and you go into it armed with a determination you will be paying attention THIS TIME. :muahaha:

Square the edges with a rotary cutter and rotary cutting ruler. I like to use a rotary cutting 12.5" square on the corner edges because that's absolutely the best corner you will ever get on a quilt, and nothing else works as well, sorry.

Sew the six light 2" border strips together using 5 seams. Sew onto the squared quilt top.

Sew the six dark 3.5" border strips together using 5 seams also. Sew them onto the squared quilt top.

If you want more instructions, leave a message here within a day of now, and I'll try to remember what I did to get the 30x57" size. Keep in mind if you want this baby twice as wide and twice as long you need four times the above, and four times the fabric amount, almost exactly.


Scan 1
VERY ROUGH DRAFT to give you the idea of what works in this top. Beware: only the top row resembles the correct alignment of 4" and 7.5" strips, which will be OPPOSITE AND NOT THE SAME at the bottom

Scan 2
An end (both ends will be opposite because you reversed where the short 4" end was every other row--doh, it's not rocket science)

Scan 3
Somewhere in the middle showing a dark set of bricks alternated.

If I screw up and told you wrong or was unclear, I apologize. For me, this quilt is like falling off a log and takes a total of 5 hours from cut to starting the border. It's a great quilt for a toddler or baby, because you didn't donate 1,000 hours of your life to doing a cutesy quilt, unless you had to unsew the whole thing 10 or 20 times, that is. Surely, you will be looking alive if you attempt it and not doing silly stuff. I have 2 other advantages--factory experience in getting sewing things done assembly line style and a choice of the two best sewing machines in the world with 10 and 11" work area between the needle and the right side of the machine where the flywheel is usually located. Both my machines have built-in walking feet, too. When one is being serviced, I can use the other. I have a backup brother I got at Walmart for $200 that has around 200 stitches, but no attached walking foot. However, the feed system is so advanced even on this modest machine it feeds right on layers. The bad thing? Instead of 10" to have fabric lay flat, I may have less than 7" or 6". I don't know. The strategy of having a backup top of the line machine is great when service time requires you to wait 2 to 6 weeks until they repair/and/or clean the 30 or 40 machines ahead of yours.

Also, you can stop that frequency thingy by simply oiling the hook and keeping the bobbin and top areas clean of cotton lint. You have to use cotton thread. Trust me, you have to use cotton thread. Otherwise, pulling on the quilt top over time puts big holes where each stitch is. Instead of lasting for 400 to 600 years, your quilt gets under 10 years of heavy use, and less than that - as in the very first time - if dear darling uses bleach to really clean the quilt you sent him downstairs with, with the prayer he didn't leave a red sock in the machine to dye your loverly werk. It takes all our exercise of a sense of humor we developed over time making ripout mistakes to forgive such a deed and say, "Oh, thank you, thank you, Rhett Butler dearest." :muahaha:

See? That's why we quilt. It gives us perspective and a sense of humor that you CAN spend a thousand hours and still get a disaster at a later moment.
 

Attachments

  • $Turquoise Basic Bargello Brickwork3.jpg
    $Turquoise Basic Bargello Brickwork3.jpg
    132.5 KB · Views: 35
  • $Turquoise Basic Bargello Brickwork2.jpg
    $Turquoise Basic Bargello Brickwork2.jpg
    134.9 KB · Views: 23
  • $Turquoise Basic Bargello Brickwork1.jpg
    $Turquoise Basic Bargello Brickwork1.jpg
    103.2 KB · Views: 38
Last edited:
Finished inner quilt and outer border. Yea! One more down, 13 to go, plus 10. It's really nagging me that I may have overestimated, so I'm going to do as much quickly quickly tops similar in time allotment as this one for the next few days if my health holds up. That way, I can rest assured that If I screwed up, I made it up, and if I didn't there will be 10 more tops to go for charity bees closet for the shelter kids. Go kids! :)

Several years ago, I made a quilt I just couldn't part with. It was a heavenly light turquoise blue on white, and I love it so it always manages to find its way to the top of the quilt stack on the bed. it is just a favorite. Working with this turquoise in a slightly darker quilt will be good for a family because medium colors do not show dirt the way light, white, and pastel quilts do. Also, while you're working on a color and your heart is all aflutter because it seems to be beautiful really makes those hours (short as they were on this particular top) pass quickly.

This quilt measures a width of 43" and a length of 78."

Here's the border, and it's so good to be done :woohoo: :
 

Attachments

  • $Turquoise Basic Bargello Brickwork4 outside borders.jpg
    $Turquoise Basic Bargello Brickwork4 outside borders.jpg
    139.8 KB · Views: 31
Spent many an hour today on quilts. Here's the result--More windmills, of which I still have a 6-inch stack in the green basket, but this time placed in blue-green planet sashings and stuff. There are 20 windmills set on point (the hard way), but these went in better than the one done about a month ago or so. There was very little ripping to do on this one, although it had its moments where that's all one could do to make things right and lay flat too. The quilt measures 56 x 68." If it had 24 windmills on it, it would have measured 78" long, plenty long enough for an adult cot quilt. That will be a consideration the next time this one is done, except there are a lot easier ways of setting them without setting them on point. It was fun to play with the stripes on the orange block below. A lot of people hate stripes because they don't play with them enough, and instead of being a nuisance, they become enough of an enigma to be conversation pieces. Stripes also make a challenge that is fun to work. Cutting is the key, but not always. In this case due to the nature of the stripe looking like a quilt was enhanced by cutting the two squares that made the point set triangles stripe run counter to the clockwise flow of the windmill since the two squares were cut using a half inch measure so that the stripes would show best. The outcome was totally serendipity. 56x68 is not a usual size lately, but will be a good wrap for a child, hopefully.
 

Attachments

  • $Waters of the bluegreen planet 1.jpg
    $Waters of the bluegreen planet 1.jpg
    92.9 KB · Views: 33
  • $Waters of the bluegreen planet 2.jpg
    $Waters of the bluegreen planet 2.jpg
    115.3 KB · Views: 30
  • $Waters of the bluegreen planet 3.jpg
    $Waters of the bluegreen planet 3.jpg
    94.2 KB · Views: 29
Last edited:
It's big enough for up to a 5' child. It was fun to do! :)
 

Attachments

  • $Waters of the bluegreen planet 4.jpg
    $Waters of the bluegreen planet 4.jpg
    91.5 KB · Views: 29
  • $Waters of the bluegreen planet 5.jpg
    $Waters of the bluegreen planet 5.jpg
    96.4 KB · Views: 25
  • $Waters of the bluegreen planet 6.jpg
    $Waters of the bluegreen planet 6.jpg
    92.3 KB · Views: 40
Today, I was gonna start and finish another bi-color quilt in nothing flat.

My husband accidentally locked me out of the house by forgetting I was in the car reading the mail. He always locks the house up. When we bought the house, every lock worked except the garage door one. We dead bolted everything else, so you can only open them from the inside on the other 3, all of which have security alarms if breached. lol Nobody answered when I yelled and again, when I honked the horn. He forgot he locked the only door I don't have a key to, and I couldn't get in any of the 3 deadbolted doors, either. He decided panicky wife was funny, so he didn't respond to the honking in 5 minutes. When I got back 3 hours later loaded for bear, he said he saw me leaving. :evil:

Dealing with early dementia is not darn funny sometimes.

So when the going gets tough the tough go shopping, and so did I. One of the pieces of mail I was reading was Hancock's half off quilt fabric sale, and their stuff is pretty good weight fabric and washes nice, so I bought a barrel of it in truly gorgeous colors. I have enough turquoise different pieces to make charm quilts into forever, I think, like I needed more fabric. And you should not shop when you are in high dudgeon about getting locked out of the house because you buy more fabric. Well, in its best light, dementia is good for the economy. :lmao:

I did 2 blocks on the next quilt, which is called Roman Stripe. There will be a lot of different prints on it, and forty blocks like the 2 below, except different shades of turquoise and complementary shades to give it some character. Your quilting should never have a dull moment. After reviewing the last few pages of this thread, I have a facepalm moment, and I don't know what to do about it except well, facepalm, and add one more quilt to the 100 to make up for my space cadet moment which I am not revealing for any reason. :eusa_shifty::redface::eusa_shifty:

Scan 1 Roman Stripes in turquoise 1

Scan 2 Roman Stripes in turquoise 2

Scan 3 A Roman Stripe traditional quilt from out there in cyberspace made by someone who has the same book as me--Quilts, Quilts, Quilts. :)

This one will take gargantuan amounts of time cutting, sewing, then cross cutting, sorting, and trying to make a decent quilt with it. I may save the blocks for another day and just make one in 2 colors in order to complete the goal of 100 quilts.
 

Attachments

  • $Roman Stripe on point 2008-andrew-1-bts1.jpg
    $Roman Stripe on point 2008-andrew-1-bts1.jpg
    36 KB · Views: 43
  • $Roman Stripe in Turquoise 2 becki.jpg
    $Roman Stripe in Turquoise 2 becki.jpg
    91.6 KB · Views: 44
  • $Roman Stripe in Turquoise 1 becki.jpg
    $Roman Stripe in Turquoise 1 becki.jpg
    72.7 KB · Views: 43
There are two quilts named "Roman Stripes" One is in square form, and the other is on the diagonal and is seen a lot in Amish country.

Below are some ideas for people who like easy quilts online, one is the inspiration for making the Roman Square Stripe in 2 colors (wrong # of stripes, but for some reason, the image came up when googled)

Scan 1 Red Stripes like basketweave

Scan 2 Roman Stripes sashed in tan

Scan 3 Roman Stripes the other kind of Roman Stripe on diagonal (aka Sunshine and Shadows by some)
 

Attachments

  • $Red and White Romanesque stripes.jpg
    $Red and White Romanesque stripes.jpg
    48 KB · Views: 41
  • $Roman stripe sashed.jpg
    $Roman stripe sashed.jpg
    56.6 KB · Views: 41
  • $Roman style stripe quilt.jpg
    $Roman style stripe quilt.jpg
    106 KB · Views: 50
Last edited:
Scan 1 Roman Stripe Baby Quilt, hand quilted

Scan 2 Vintage squares found at a website specializing in antique quilt squares saying these were 30s. I'm thinking they're older than that, but not certain

Scan 3 Contemporary interpretation of Roman Stripes in autumn-feeling cotton fabrics
 

Attachments

  • $Z Roman Stripe 1010 2543.jpg
    $Z Roman Stripe 1010 2543.jpg
    34.3 KB · Views: 41
  • $z roman stripe blocks B131.JPG
    $z roman stripe blocks B131.JPG
    23.1 KB · Views: 46
  • $Roman Stripe quilt 100_3196.JPG
    $Roman Stripe quilt 100_3196.JPG
    57.2 KB · Views: 41
Getting so inspired by internet pretty Roman Stripe ideas...

Scan 1 Traditional Amish Roman Stripe on Diagonal

Scan 2 Roman Stripe in Teals

Scan 3 Roman Stripe arranged to look like Staircase, someone's first quilt, too. It's an easy and beautiful effort!
 

Attachments

  • $Amish Roman Stripe quilt.jpg
    $Amish Roman Stripe quilt.jpg
    88.1 KB · Views: 46
  • $Amish RomanStripe in teals.jpg
    $Amish RomanStripe in teals.jpg
    18.4 KB · Views: 54
  • $Z Roman Stripe first quilt close.jpg
    $Z Roman Stripe first quilt close.jpg
    64.3 KB · Views: 42
Now it's decision time--put the two slavemaker squares aside and make a 2-tone stripe quickie quilt or bite the bullet and sweat them for the next 3 weeks like the tree quilt about a month ago (seems like a year)...

...too much think....ing...

And whoever made the graphics bigger. a huge big hug plus a huge big wet, sloppy kiss from Ms. Music. :D
 
Three more blocks were made this morning. They just got slid under the lid and scanned...

Now, it's back to the machine to cut out fabrics for another row. This one is the last easy one because there was a cache of fat quarters found on the internet at a bargain price. When the packet was undone, the bargain price was due to light damage on some areas of a few of the pieces, noticed during the pressing creases out phase. Those must have been bundled together for 5 years. Oh, well, the choices change every 6 months, it's fun to see what was being used years ago. It adds a character of antiquity to the quilt when some of the strips are from 100 years old up to the present. It's time to visit the 30's pail and see if there's a good turquoise, aqua, or lake colored print.

Scan 1 one side
Scan 2 other side
Scan 3 somewhere in middle of 3 joined squares.
 

Attachments

  • $Roman Stripe in Turquoise 5.jpg
    $Roman Stripe in Turquoise 5.jpg
    109.5 KB · Views: 46
  • $Roman Stripe in Turquoise 4.jpg
    $Roman Stripe in Turquoise 4.jpg
    128.3 KB · Views: 42
  • $Roman Stripe in Turquoise 3.jpg
    $Roman Stripe in Turquoise 3.jpg
    94.9 KB · Views: 48
One more square to show, and have 8 more than this ready to cut and sew. This quilt is a LOT OF WORK. It took me a whole day and almost all of it until tonight, plus I worked on it yesterday to 2 am.

There were 8 rows planned, but if this one is gonna get done, I could cut it from 5x8 down to 4x6, and just add borders to make up for some of the difference.

I'm just so tired. Hope everyone is doing ok and enjoying the quilts I found above.

Goodnight everybody.
 

Attachments

  • $Roman Stripe in Turquoise 6.jpg
    $Roman Stripe in Turquoise 6.jpg
    93.5 KB · Views: 48
This quilt reminds me of the army. If there's nothing to do they think of something to do, no matter how useless, no matter how boring, ya just do what ya gotta do... In 4 or 5 hours in front of the machine, there's so little to show, so much more to do...

*sigh*

Only one scan. I'm pretty sure strips have been cut, possibly sewn (?) for four more squares.

Some days, it is just a matter of reconnoitering. The great days are when you finish the work. This one is coming along as slow as the 3-week tree, and weeks are running down. I keep forgetting to write down all the quilts that have been made in the notebook. lol Accounting is no fun and takes time away from sewing. :evil:

And it's raining cats and dogs here.
 

Attachments

  • $Roman Stripe in Turquoise 7.jpg
    $Roman Stripe in Turquoise 7.jpg
    78.5 KB · Views: 41
Turquoise blue is such a good color. Wasn't I carrying on about glacier blue a bit back ago? Oh, yes, the tree sky was glacier. :rolleyes:

Maybe it is just a stunning color. There are already two rows sewn together. My heart leaps when I look at it. It's almost like being in love. Really.

Wasn't there a really pretty quilt from search a few days ago that was put in the Pictures file--going to look. BRB.

Well, here are two and Drurer's Praying Hands asking God to bless our dear troops:
 

Attachments

  • $Final-Blue-Strings-550x412.jpg
    $Final-Blue-Strings-550x412.jpg
    96.4 KB · Views: 46
  • $il_fullxfull.285151504.jpg
    $il_fullxfull.285151504.jpg
    428.5 KB · Views: 37
  • $Drurer hands Large.jpg
    $Drurer hands Large.jpg
    36.1 KB · Views: 45
Turquoise Roman Stripes Charity Quilt

The scans are just of new blocks done this morning through late this evening. ;)
 

Attachments

  • $Turquoise Roman Stripe 10.jpg
    $Turquoise Roman Stripe 10.jpg
    75.6 KB · Views: 41
  • $Turquoise Roman Stripe 11.jpg
    $Turquoise Roman Stripe 11.jpg
    87.3 KB · Views: 46
  • $Turquoise Roman Stripe 12.jpg
    $Turquoise Roman Stripe 12.jpg
    85.8 KB · Views: 42

Forum List

Back
Top